Feature: When you move the mouse over various buttons on the View
Window, you can get further information about the data behind those
buttons. For example, if you move the mouse over the Notify button,
you will get a message (called a Tool Tip) that tells you how many
Notifications the displayed member/non-member currently has
connected to him. If you move the mouse over the Memo button, you
will get a display of the first 160 characters of memo information,
if there is any for this member/non-member.
Clicking the VIEW toolbar button on the Main Window
will display a View text box that allows you to search for a name
in the membership database to display and when the name is found,
the View Window will open to display the record and allow
you to perform updates of the displayed record. In the View text
box, you can use the * mask character once at the end of a series
of characters to search for the first entry in the database whose
last name field begins with that series of characters preceding the
*.
The Update Mode menu bar option on the View Window
allows you to choose how to handle updates you might make. The
options are:
Ask if change: if you make a change and don't click
Update before returning or moving to another member, you
will be asked to decide whether to make the change. This is the
default if no other option is chosen.
Auto change: this option will automatically make any changes
take effect when you click Return or move to another
member.
Don't ask, don't change: if this option is in effect, no
changes will be made unless you click the Update button
after making the change and before returning or moving to another
member. If you don’t click Update before returning or moving
to another member, no changes will take effect.
These options remain in effect for this use of the application
only. Next time you start up the program, you will get the default
"Ask if change" option.
Once you enter the View window as a result of the
View command, you can perform the following functions:
2-Line: makes the lastname field
print on one line and the firstname field print on a second line,
as opposed to lastname, firstname on a single line. If you change
the value of this box (either from blank to X or from X to blank),
you must click the Update button to allow the change to take
effect.
The horizontal scroll bar:
this control allows you to navigate to any member in the database
by sliding the bar as far to the left or right as you wish or by
clicking repeatedly on the arrows. Each click on the left arrow
will move the system to the previous record while each click on the
right arrow will move the system to the next record.
Delete: put the currently
displayed record in Delete Status. If you put a record in
Delete Status, you can later click Undelete (see
below) before closing the database if you decide not to delete the
record. Record deletions do not actually take effect until you
close the database, either by: exiting the program, opening another
database, or re-opening the current database.
Undelete: change the status of
a record that was previously placed in Delete Status before
closing the currently open database. This will prevent the record
from being deleted when the database is closed. See Delete,
above.
Transfer: will transfer a
member record to the non-member roll and will tranfer a non-member
to the Member roll.
Find: enter data in any one of the
text fields and click this button and the data base will be
searched for a record containing the information entered.
Update: modify any or all text
fields and click this button and the change will be made to the
database.
Last Viewed: this button will
redisplay the data for the member or non-member previously found
via the Find button (see below), if any.
Return: closes the View window
and returns you to the previous window
Find: To find another record,
simply type as much of the last name as you want to search for in
the last name text area and leave at least one blank after it and
click the Find button. All other information in the last
name text box after the blank will be ignored and will not be used
as part of the search.
Memo: Allows you to store
information on an as-needed basis into an electronic version of a
memo pad. You can put timely information here, such as when you
last contacted a member or if there is an unusual financial
situation, what the facts of the situation are and what the
resolution is. You can use various fonts in your memo text. If you
want to use a right-to-left Hebrew font, click the Keymap
menu item. This will display a text box where you can enter Hebrew
text in correct order. When done entering your Hebrew text, simply
click the Copy button and the Hebrew text will be appended to the
end of your existing memo data. The time and date of creation of
the memo, time of last update of the memo, and time of last reading
of the memo are displayed.
In addition, you can specify a notify date, which will cause the
system to produce a message on program start-up when that date has
arrived (see Options
Operational topic “Memo Notify” for information on how to turn
on/off the memo notification system).
Note: when you move the mouse over the Memo button, the first 160
characters of the memo text are displayed in a Tool-tip window
(however, text is not displayed in the actual fonts that are used
in the memo, so a Hebrew letter will display as the English key
equivalent of the Hebrew letter).
Family: Displays the Family window, which allows you to enter
and display the Hebrew and English names of relatives of the member
or non-member and the names of the member's (or non-member's)
children, in addition to all family birthdays.
Schedule: press this button to
schedule events for this member or
non-member
Committees: this
button displays the Committee Window:
The bottom section of the Committee Window is a list of the
committees that currently exist in your institution. Add a new
committee by entering a committee name in the lower text box and
clicking the Add Committee button. To delete an existing
committee, display it in the lower text box and click the Delete
Committee button. The Return button closes the
Committee Window and takes you back to the View
Window.
The top section of the Committee Window is where you choose
what committee(s) you want to add the displayed member to and also
display which committees this member is currently a member of. To
display the committees this member belongs to, simply use the arrow
next to the upper text box to scroll through the names in the upper
text box. To add the member to a committee, display the committee
name in the bottom text box. Then choose which spouse of a couple
(or both) is to be on the committee via the buttons to the right.
Then click the Add To button in the upper part of the
Committee Window to add the member to the selected
committee. To remove the member from a committee, select the
committee in the upper text box and click the Remove From
button.
Notify: press this button to view
and/or modify or add notifications for this member or non-member.
You can use the Notify window to connect a notification of the same
person to as many different members/non-members as necessary, and
all will be notified at the same time.
Save Contact: press this
button to save the information in the displayed record as a contact
entry in your Microsoft Outlook Contacts folder.
Record Number: This field
displays the record number of the currently displayed record. If
you enter a different valid record number, the system will
automatically find the record and display its information on the
View window.
Permanent seat indicator: if checked, this means this member owns at least 1 permanent seat
Locked indication: if checked, means data for this member cannot be changed in other windows
No label indication: if checked, means labels will not be printed for this member even if the member is part of a general label printing
Member type: choose one of the Member Types that you have set up via the Options (Options) menu/General option
Board member indicator: if checked, this member is a member of the board
Sisterhood member type: Choose different type of membership: associate, regular, life
Tribe: Choose the tribe: Kohan, Levi, Israel
Box number: the mail box or storage box (“cubbie”) number assigned to this member
Number of kids: used to determine the Youth fees that will be displayed in the Youth column of the Accounts Receivable window, based on the Youth Fee amounts set in the Miscellaneous Fees window.
Occupation: up to 2 can be specified, such as one for husband and one for wife
E-mail addresses: up to 2 can be specified, such as one for husband and one for wife. These e-mail addresses will be used to send statements to the member if the e-mail statement feature is enabled via the Options|Operational|E-mailing window and also if the check box for sending e-mail to this member is checked on this window (see below). If two addresses are specified, both will receive statements via e-mail if the above criteria are satisfied.
Seat assignments: opens up the window for Seating assignments (see Seating)
Plot assignments: opens up the window for cemetery plot assignments
Last aliyah date: enter the date of the member’s last aliyah
Special arrangements: if applicable, you can use this button/check box to display the Special Arrangements Window, which allows you to specify special lower rates for indigent members for their dues, youth, chevra and building fund amounts, and also institute a payment schedule that differs from the normal pay periods you have established for this member type.
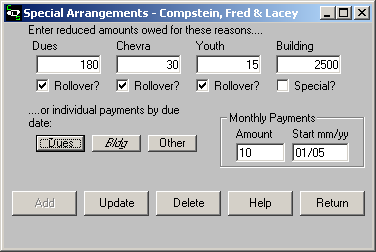
The Special Arrangements Window (shown above) allows you to insert amounts that differ from the standard amounts for this member type as set up in the Options|General|Member Types window. You must enter amounts for Dues, Youth, and Chevra. If you check the Special check mark under the Building Amount, then the amount you enter in the Building box will be used as the amount to be charged for this member; otherwise, this member will be charged the amount displayed in the Bldg Total column of the Accounts Receivable window. The Rollover check boxes, if checked, allow you to use the same settings for the next year after you do a New Year reset.
You can also create individual payment schedules for Dues, Bldg, or Other items by clicking the appropriate buttons. You will get a window (see below for an example of a Building Fund payment schedule window) that will allow you to enter amounts due and the dates they are due going forward.

Round Robin: opens the Round Robin (Mishloach Manot) window for this member
Relationships: this opens a window where you can specify if a member is related to another member and how they are related
E-mail statements: Allows you to indicate whether this member will receive statements via e-mail (see Options)
Items displayed on the View Window are:
Last Name: the last name of the member
Title, First, Middle for Man: the title (Mr., Dr., etc) and
first and middle names of the male adult of this member’s
household
Title, First, Middle for Woman: the title (Mrs., Dr., etc)
and first and middle names of the female adult of this member’s
household
Marital Status: choose one entry from the list
Address 1: the house number and street name
Apt: the apartment number, if applicable
Address 2: the city and state in the city,state box and the
zip code in the zip code box. If the Options|Formatting|Use
Organization Address for Members item is checked in Options,
then this field can be left blank and the system will then
automatically substitute (when displaying the address for this
member on reports) the Address Line 2 and Zip Code as was entered
in the Name/Address of Your Organization window, which is
set via Options|Formatting|Organization.
Phone: home and office phone numbers. You can specify 2
numbers in the office phone box by clicking on the box that says 1.
The second box can be used for a 2nd office number or a
cell-phone number.
Add/Change Date: set by the system and not modifiable by the
user
Record Number: to display a specific record by its record
number, enter the record number in this box and the system will
attempt to proceed to the record number indicated and display that
record in the View window.
Total Records: set by the system and not modifiable by the
user