The SEATING management feature of the CMS system can provide
you with data on seat assignments and placement and can be used to
produce seating charts for each of your seating facilities. There are
three different types of seating data that are tracked:
Regular: Records current seat assignments for the current
year's holidays.
Permanent: Records any permanent seats that have been
purchased and dedicated by members.
Last Year: Saves current year’s seating assignments for
use next year.
Initially, you would fill in data for Permanent seats and Regular
seats. Once the seating season is over, you would move the Regular
seat information to the Last Year seat database and clear the
Regular seat database via the Actions|Seating|Move Reg to Last
Year menu option. Then when preparing seats next year, you can
either copy the previous year's seats for a member from the Last
Year database to the Regular seat database via the Copy
button on the Last Year Seats window, or enter new data for this
member directly into the Regular Seats window (see display below).
Permanent seats are stored separately from Regular seats and via
the Copy button on the Permanent Seats window you can automatically
copy the permanent seat assignments of a member to the regular seat
roster for that member. Note: Non-members do not have capability
for permanents seats.
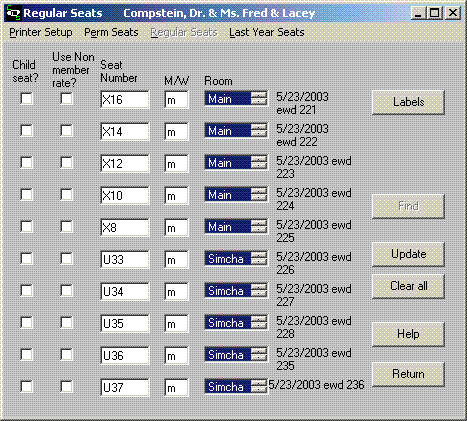
Seating Window
Seat assignments for members and non-members are entered via the
Seating Window. To display the Seating window for members, click
the Seats button on the View Window. Once you are in
the Seating window, you can choose Regular, Last Year, or Permanent
Seats from the menu at any time.
You can manually enter seat numbers or use the Find button to find
the next available seat based on criteria you specify.
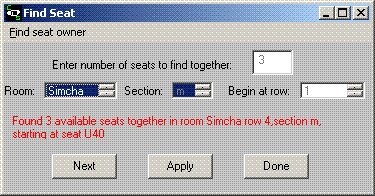
On the Find Seat window, you specify the Room, Section, and Row
where you want to begin searching and how many seats together you
will need. Click the Find or Next button and system will search for
available seats that match your criteria and return details on what
was found. If the seat found is acceptable to you, click the Apply
button and the found seat will be placed in the member’s list of
seats. To find the next seat for this member, click the Next
button. When done finding seats for the member, click the Done
button.
Seating Reports
The system will prevent a seat from being assigned twice and you
can use the Reports|Seating menu option to preview/print a
report on all seats you have assigned, sorted by name of owner and
also by seat name.
Seating Charges
Automatic billing of seats is provided via the Miscellaneous Fees window, which is accessed via the
Options|Financial window. Here you specify charges for Adult
Member, Child Member, Adult Non-member and Child Non-member seats.
When you enter a Regular seat number in the Seats window, you
indicate whether the seat is child or adult. The system will
automatically apply the specified charge to the member or
non-member's account. You can view these billed charges by bringing
up the Accounts Receivable or Non-Member windows and examining the
High Holiday column.
Seating Chart
To use the seating feature to its fullest capability, you should
provide a 'chart' of your seating layout by facility, seatname,
row, and section (Men/Women) and the system will be able to answer
queries such as: find the first free seat in a group of 3 free
seats in a row starting at row 5 in the Men's section in Room 1
To implement this feature, you need to create a seat chart file
called CMS.SCT, and this file must reside in the same folder
as your other CMS. files (such as CMS.txt) and your .exe file.
The CMS.SCT file can contain 3 types of data records:
comment record(s).
room record(s)
row descriptor record(s)
The format of these records is as follows:
Comment Record
A comment record begins with the characters /* in column 1 and can
contain any information you desire.
You can also have totally blank lines, which will be ignored, for
spacing purposes in the file.
Room Record
*room roomname
The start of each seating facility (even if you only have a single
room) must begin with *room roomname where roomname
is the name of your particular facility, such as Sanctuary, Main,
etc.
Row Descriptor Record
Following a room record, you provide row descriptor records
as follows:
S/P/F/B seatnum1 seatnum2 seatnum3 seatnum4
……….
where S/P/F/B is called the control descriptor
and must start in column 1; S is required and
P/F/B are optional but if F is
specified, P must be specified and if B is specified,
P and F must be specified. These values are coded as
follows:
S = "m" for men's row and "w" for women's row (or any other
single character) (required)
P = page number for printing seating charts (max 9 pages).
This number means that all rows with the same page number will
print on the same page; since an 8 x 10" sheet of paper cannot
generally hold an entire seating chart, you break the facility into
sections that can fit on one sheet of paper and assign each section
a page number (optional). Note: There are 9 pages maximum per
section, but you can have any number of sections; thus, if you have
3 sections, each section can have up to 9 pages, which could print
a chart of 27 pages if each section had 9 pages.
F = left-most # of filler spaces or default is 0 if omitted
(max 9 spaces) . This value enables you to indent a number of
spaces (optional) (see Example 1 below).
B = number of blank rows to display following this row, to
allow for gaps between rows which may exist due to aisles, bimah,
or pillars (optional).
One row descriptor record line in CMS.SCT corresponds to one
'row' of seats, where a row is a run of adjacent seats.
You can use any numbering/naming scheme for the actual seats
themselves, but you should try to be somewhat consistent, as in a
row/seat number scheme such as MA1 for men's section, row A, seat 1
and MB1 for men's section, row B, seat 1, etc.
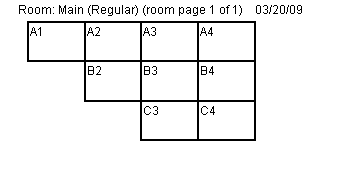
Seat Chart Example 1:
*room Main

m/1/0 A1 A2 A3 A4

m/1/1 B2 B3 B4

m/1/2 C3 C4
You would use 1 filler for row B and 2 for row C so that when the
chart is printed, the columns line up correctly. No fillers are
needed for the end of a row, since the default is
left-justification.
Row 1: the control descriptor m/1/0 indicates this is
a Men’s row, should display on page 1 for this room, and has 0 seat
gaps on the left-hand side.
Row 2: the control descriptor m/1/1 indicates this is
a Men’s row, should display on page 1 for this room, and has 1 seat
gap on the left-hand side.
Row 3: the control descriptor m/1/2 indicates this is
a Men’s row, should display on page 1 for this room, and has 2 seat
gaps on the left-hand side.
Here is what the chart would look like for seat example 1:
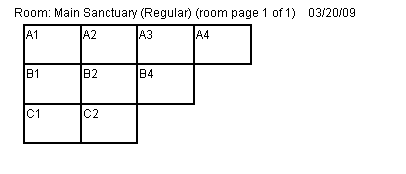
Seat Chart Example 2:
*room Main SanctuaryThis example is similar to example 1, except here the
seats in rows 2 and 3 have gaps to the right instead of the left.
This is automatically done due to left-justification, so the F
filler values are coded as 0 (or can be omitted entirely) as in:
m/1/0 A1 A2 A3 A4
m/1/0 B1 B2 B4
m/1/0 C1 C2
m/1 C1 C2
Here is what the chart would look like for seat example 2:
Seat Chart Example 3:
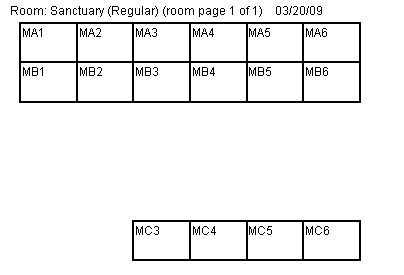
*room Sanctuary

m/1/0 MA1 MA2 MA3 MA4 MA5 MA6

m/1/0/3 MB1 MB2 MB3 MB4 MB5 MB6

m/1/2 MC3 MC4 MC5 MC6
This example displays one facility with 3 rows in a men's section
with 6 seats per row. There is a spacing of 3 rows following the
second row. The third row starts 2 blank seat positions to the
right. The names of the seats in this file must match the names of
the seats that are assigned via the Seats window (accessed via the
Seats button of the View window). You can then use
the Find button on the Seats window to help you locate unused seats
and find a number of unused seats together, beginning at any row
you choose. The CMS.SCT seat chart file need only be created one
time (and only modified if your seating arrangement changes).
Here is what the chart would look like for seat example 3:
--End of Examples—
To preview/print a copy of the seating chart, with assigned seats
displaying the name of the person to whom the seat is assigned, use
the Reports|Seating|Chart|Regular or the
Reports|Seating|Chart|Perm Seats or the
Reports|Seating|Chart|Last Year Seatsoption from the main
window or the Financial window.
Seating Labels
You can produce seating labels which can be attached to your own
pre-printed seat tickets in the following way: first run the
Seating Report by clicking the Reports|Seating|Regular menu
item from the main window. When the report has completed previewing
or printing, click the Actions|Print labels menu item from
the main window to produce labels which consist of the seat-owner's
name and the seat number that you have assigned to that family. You
will get one label per assigned seat. To print seating labels for
just one seat-owner, use the View Window/Seats button to view the
Seats window and use the Labels button on the Regular Seats window
to print the labels.