One of the first tasks you should perform after installing the
system is determining what different member types you would like to
define for your institution. Associated with these member types are
the various charges that this member type will be responsible for.
Sample types you might want to consider are: Full Member, Associate
Member, Out-of-Town Member, Renter. Define a member type so that
its dues/chevra/etc differ from other member types. You can have a
maximum of 10 different member types, which are set via the
Options|General menu item, Member Types
button.
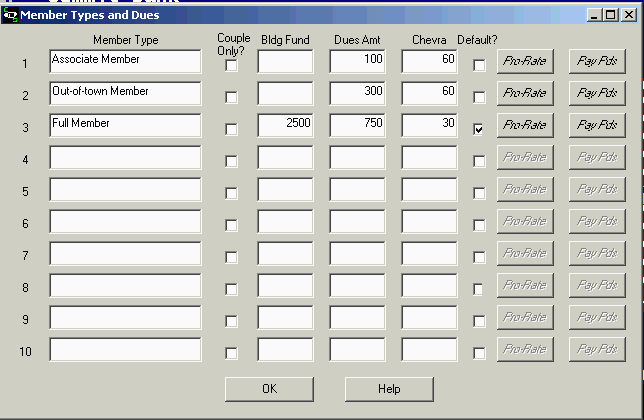
Member type: Each Member type can have its own
Building fund amount, Dues amount, and Chevra amount. Any one of
those can of course be set to zero if the amount is not applicable
to the particular member type. In addition, each member type has a
Pro-rating and Pay Periods button so that you can set
those associated values (see below). The Couple only check
box should be checked on if a member type can only be a couple,
such as husband and wife. The Default check box should be
checked for the one member type that will be the default when
adding a new member if no member type is specified at the time of
adding the new member.
The other values associated with a particular member type are:
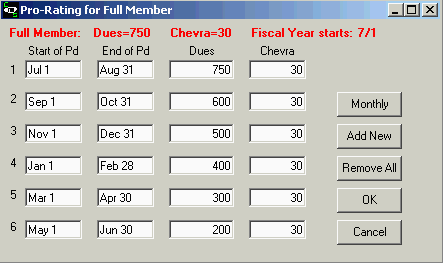
Pro-rating:The
Pro-rating button allows you to set lower dues/chevra
amounts for the first year a member joins if the member joins
sometime after the start of your fiscal year. For example, if a
member signs up in January and your fiscal year begins in July, you
might want to only charge that member less than your regular dues
amount for that first year, since they were only members for half
the year.
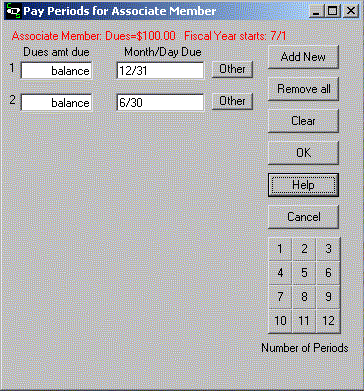
Pay Periods for Dues: The Pay Periods button allows you to set the different dates and amounts during the year when partial payment for dues is required. You would then produce your statements to coincide with those pay period settings. For example, if your pay periods are July 1, October 1, January 1, and April 1, you would want to produce your statements 4 times a year, probably in June, September, December, and March and mail or e-mail them in time for your pay period start dates.
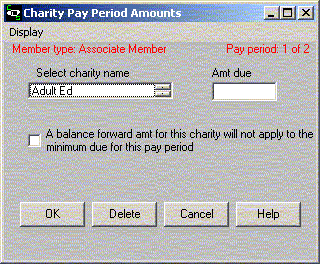
In addition, you can specify other payment items which require
fixed amounts due at specific pay periods by clicking the Other
button next to each pay period on the form. (See the Charity Pay
Period Amounts window, displayed below)
charity in the combo box with heading "Select charity name" and put an amount in the text box with heading "Amt due". You can have a different amount due for each charity for each pay period that has been created for each different member type.
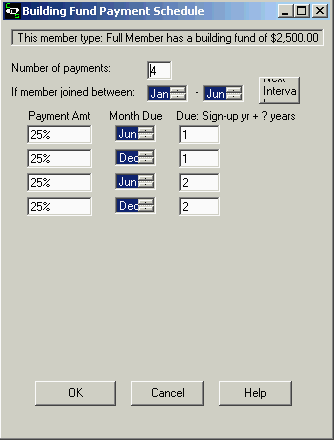
Building Fund Payment Schedule: To set the Building Fund Payment
Schedule values, double click a non-zero building fund amount
in the Member Types window and you will get a new window (see
example below), which allows you to specify parameters for building
fund payments. You can choose different building fund payment
schedules based on what month of the year a member signs up and
also choose how many payments are required to pay off the building
fund. You also specify what month each payment is due and in which
year after the member joined that the payment is due. For example,
you might want to allow a member to pay the building fund amount
over a 4-year period with ¼ of the full amount due each year
beginning with the 2nd year of membership. All of this
information is specified on the Building Fund Payment Schedule
window. To delete an interval entry for a member type, simply set
the number of payments to 0 and click the OK button. To add an
additional interval entry for a member type, click the Next
Interval button and change the number of payments to a value
other than 0 and complete the rest of the form. Then click the OK
button. This will save your new interval data.
Once all your member type information is established, whenever a
new member is added to the database, the member type to assign to
the new member will be selected via the View window. You can also
choose a default member type that will be assigned if no other
member type is selected at the time a new member is added.
Example: amount a member now owes for the building fund is computed
based on the following rules:
If member signed up between Jan and June of year x, requires: 1/4
on June bill of year x + 1
1/4 on Dec bill year x + 1
1/4 on June bill of year x + 2
1/4 on Dec bill year x + 2.
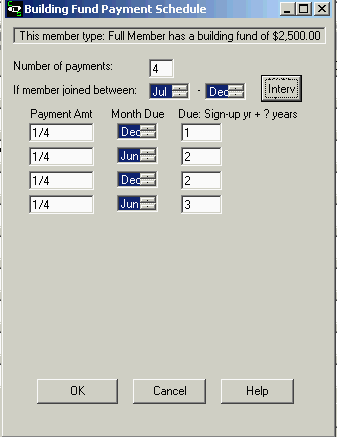
If member signed up between July and Dec of year x, requires: 1/4
on Dec bill of year x + 1,
1/4 on June bill of year x + 2,
1/4 on Dec bill of year x + 2 and
1/4 on June bill of year x + 3.
then add any additional building pledges made. This would be
entered in the Building Fund Payment Schedule window as two
intervals with values as shown below:
