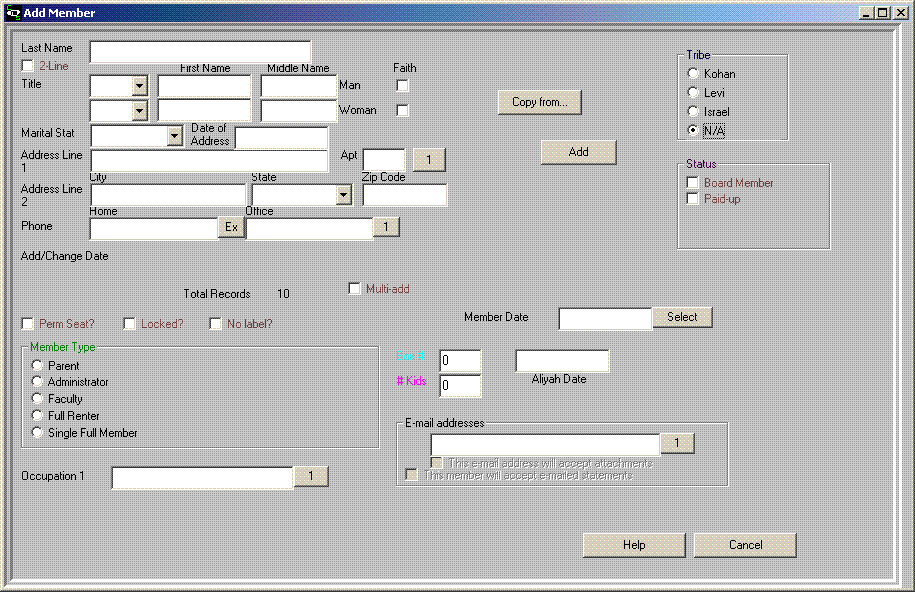
The ADD toolbar button of the Main window opens up a window
that allows you to add a new record to the database. When you first
add the new record, it will be placed at the end of the database.
If you use the Sort command, at that time the added record will be
placed in its proper location alphabetically by last name. The sort
will also take place automatically when you exit the program. You
can also choose to set the Options|Operational autosort option on,
which will automatically sort the name right after you add it.
Controls on the Add window:
Last Name: enter the last name of the member here
Two-line: if you want a second line in the name, such as a
company name, click this check box
Title: Choose from Mr., Rabbi, Prof., or Dr. for man, and
Mrs., Miss, Ms, Prof. or Dr. for woman
First: First name of the man goes in the top name box, first
name of the woman goes on the next line name box
Middle: Middle name of the man goes in the top name box,
middle name of the woman goes on the next line name box
Marital Stat: choose from Married, Single, Divorced,
Separated, Widowed, Partnered
Address1: house number and street name
Address2: city and state; if you leave this line blank and
have turned on the Use Org Address option (see Options), then the system will
automatically insert the organization's city and state (and
zip code). The organization information can be set/modified via the
Organization option, which is found on the Options menu.
Zip code: the zip code (6 digits or 10 digits); you can
specify just the last 4 digits of a 9-digit zip code by entering a
dash followed by the last 4 digits of the 9-digit zip, and these
last 4 digits will be appended to the end of the organization's
address and used as this member's city/state/zipcode address, if
the Use Org Address option is on.
Home phone: home phone number in format (aaa) eee-ffff where
aaa is area code
Office phone: office phone number in format (aaa) eee-ffff
where aaa is area code
Multi-Add: check this box if you will be adding several
members at one time so that the Add window will re-appear
automatically after adding a member.
Add: clicking this button will cause the data to be added to
your currently-open database
Help: displays this Help information
Return: returns to the previous window
Note: To create an entry that will print on labels
with 2 name lines instead of first and last names on a single line,
use the 2-line choice box. For example, if you want a label to
print like:
Compugene Software

Dept O11

P.O. Box 4141

Highland Park, NJ 08904-4141
click on the 2-line choice box to put an X in the box, make the
1st line field in the Add window: Compugene
Software, and make the 2nd line field: Dept
O11