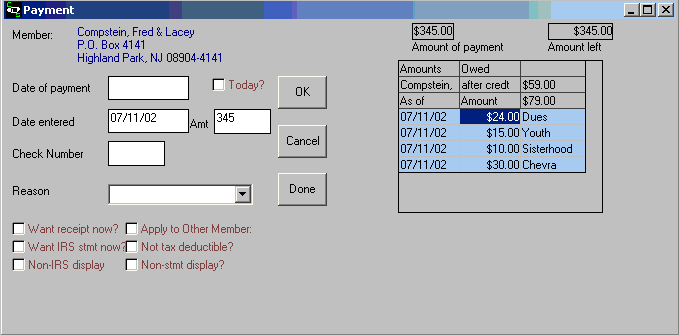
The Get Payment window displays automatically
whenever you enter an amount into a cell in the Amounts Paid column
of the Accounts Receivable window and click the Enter key.
Controls on this window are as follows:
Member: The system displays here the member name and
address of the member into whose row you entered an amount in the
Amounts Paid column of the Accounts Receivable window.
Amount of Payment: The system displays here the amount you
entered in the Amounts Paid column.
Date of Payment: Enter the date of the payment here. This
can be the date on the check itself or the date you received the
check or any date you desire. If you click the Today check box,
today’s date will appear in this box.
Today: Click on this box to display a check mark and put
today’s date (as determined by the User Date setting of the Options
window) in the Date of Payment box.
Date Entered: Today’s date (as determined by the User Date
setting of the Options window) will automatically appear here. You
can leave it as is or enter any date as the payment enter date. An
option that you can set in the Options window allows you to display
payments based on the Date of Payment (also referred to as the
Check date) or the Date Entered.
Amount: You can enter an amount less than or equal to the
amount you entered in the Amounts Paid column of the Accounts
Receivable window, or click a row of the Small financial grid that
is displayed on the right of the window to pay an outstanding
amount due (see below).
Check Number: Enter the check number of the check being used
to pay this amount. You can use a special value here, such as Cash.
To see the list of valid special values that can be entered here,
please see the section entitled Special Values for Check Number
Field in the Tips and Techniques
section.
Reason: Use this drop-down list to choose a reason for this
payment, or enter a new reason, or let the system place the reason
here when you click on a row in the Small financial grid that is
displayed on the right of the window (see below).
Receipt: Click on this box to display a check mark to
produce a receipt for this payment.
Non-stmt display: Click this box to display a check mark to
have this payment not display on statements.
Apply to Other Member: Click this box to display a check
mark to open a drop-down list of all other members and allow you to
click the name of another member that this payment should be
applied to. At that point, another Get Payment window will open to
allow you to pay for the other member.
Small financial grid: The system displays a small financial
grid of amounts due on the right of the Get Payment window; you can
left-click on a row of this grid and the system will automatically
enter the amount owed and the reason for the amount owed from the
row you click into the appropriate boxes of the Get Payment window.
If you right-click the mouse, the grid display will alternate
between Balance Forward amounts owed (if any) and regular amounts
owed. If any Balance Forward amounts are owed, that will be the
first grid displayed when the Get Payment window appears.
OK: Pressing this button will apply this payment. If the
amount entered in the Amounts Paid column is more than the amount
of the item just selected for payment, an updated window will then
display to allow you to pay for another item and so on until the
full amount of the payment has been used or you click the Done
button (see below).
Cancel: Pressing this button will cause this payment to
not be applied.
Done: Pressing this button will apply this payment and close
the Get Payment window. If the amount entered in the Amounts Paid
column is more than the amounts of the items selected to pay for,
the remaining amount will now become a Credit amount for this
member.