The steps involved in creating and running your online Round Robin are as follows; all steps are detailed below:
1- Initialize your online Round Robin
2- Users login and select their choices until the last date of the Round Robin, as determined by your setting
3- If desired, the administrator can modify options while the Round Robin is active
4- Collect the Round Robin data
As a designated administrator of your organization's Round Robin, you have the ability to:
- set values that will personalize the appearance of the site to your members
- determine if members will be allowed to change their own passwords
- determine if members will be allowed to choose Reciprocal as a choice
- set the wording of e-mails that can be sent (if desired) to members informing them of their newly assigned usernames and passwords
- view/update member data
Steps to follow as an administrator to set up and process your online Round Robin
Suggestion: If your organization already has its own web site, you can easily modify your web page to add a link to point to the Online Round Robin so that your users can go to it directly from your existing web site. Simply have your web site administrator add the following code to your web site's HTML:
<a href="http://www.compugene.com/rrlogin.php">RR Login</a>
Decide on the settings you want for your system options:
- determine the text and layout of the e-mail that you want sent to members when a member is assigned a new username and password; you can accept the default text (see below).
- determine what message, if any, you want displayed to your members when they successfully log in to the system; you can change this message whenever you want to; the default is no welcome message.
- determine the various system options, explained below in the section headed View/Update System Options.
Initializing your RR System
1- Start the Compugene Membership System on your pc.
2- Ensure all pertinent member data is entered into your database; you should enter all available e-mail addresses for all your members into the Compugene Membership System database. A member's e-mail address will be used to send an e-mail to that member when his username/password is created.
You can also set up to three different member types in the View window that you can then reflect on the Selection window of the < style="color: rgb(0, 0, 0);">online RR system. For example, you can have a member type of Regular and Officer in your database and then display two separate lists on the selection window, one with all Regular members and one with all Officers.
3- Click the View button on the tool bar to display the View button on the Main Window and click this View button
4- Click the Mishloach Manot button on the View window that is displayed
5- Click the menu item that says "Online RR" and select "Set Online RR Administrative Values".
6- Fill in all pertinent information in this window and then select the menu item "Review E-mail Template", where you can set the format of the e-mail that will be sent to members when a member is assigned a new username and password. See below for additional information on the E-mail Template.
7- Click the menu item that says "Online RR" and select "Create and Send".; you will get a message indicating that data is now in the clipboard and also in a file whose name will be displayed in the message.
8- Create an e-mail on your pc with the e-mail system that you use (such as AOL or Outlook) and attach the file created in step 9 to this e-mail and send it to admin@compugene.com with a Subject line of "Online RR". Once Compugene Software receives your e-mail, your data will be entered into the online RR system. As the data you provided is entered into the system, an e-mail will be sent to each member's e-mail address with their newly assigned username/password. When this process is completed, you will be notified via e-mail.
Once your online RR has officially ended and all your members have selected their choices, perform the following steps to get the online RR data into the Compugene Membership System database on your pc:
1- Log in to the online RR system with your administrator username/password and select the button labeled Send Selections Via E-mail. This will e-mail all member selections in coded form to the e-mail address(es) associated with your username. Once your receive this e-mail, proceed to the next step.
2- Start the Compugene Membership System on your pc
3- Click the View button to display any member
4- Click Mishloach Manot on the View window
5- Click the menu item that says "Online RR" and select "Import from e-mail". A text box will appear. Copy the data from the e-mail you received in step 1 above; paste it into the text box that appears and click OK. All the online RR system member selections will be automatically entered into the Compugene Membership System database on your pc. At this point you can perform the standard RR processing, such as reciprocation.
Performing Administrative Functions
After logging in, if you are a designated administrator, you will see the following Welcome window:
The administrator-only section will appear if you are a designated administrator; regular members will not see this section.

The first time you get access, you should review the settings in the View/Update System Options section.
View/Update System Options
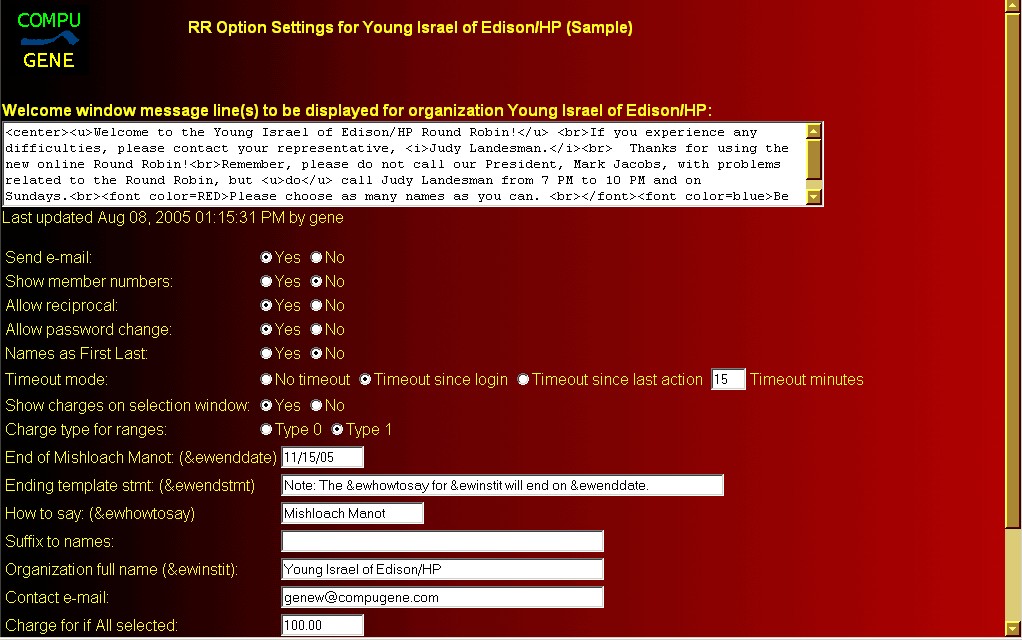

Selecting the View/Update System Options button will display a window (see example, above) that will allow you, as administrator, to view and set parameters that control the formatting of windows that will appear to your users and also set other values that control the behaviour of your Online Round Robin.
First administrator option:
Welcome window message line(s) to be displayed: The first option on the systems options window is a text box where you can specify message lines that will appear in the message area of the welcome window, which is the first window a user sees after successfully logging in; you can use HTML tags to format the message lines; e.g. <center>Line</center> would cause centering of a line; you can also use symbolics in the message text - they will be substituted for their assigned values before the message is displayed. The following symbolics can be used in the welcome message (see the section on "View/Update E-mail Template", below, for more details on symbolics):
&ewinstit the full name of your organization as you want it to appear in e-mails and in the welcome window mesage
&ewhowtosay your choice of "Round Robin", or "Mishloach Manot" or whatever you choose to call the online Round Robin
&ewenddate the last date that members can update their Round Robin selections online
&ewadmin the name of your online Round Robin administrator
&ewpurim the English calendar date that Purim will next fall out
For additional assistance, please contact Compugene Software.
The second set of administrator options consists of choices that you set to determine the following:
- Send E-mail: click Yes to indicate that e-mail should be sent to members when usernames/passwords are assigned, else No; use the View/Update E-mail template button (see below) to control the text of the e-mail the member will receive when his username/password are assigned.
- Show Member Numbers: click Yes to indicate that sequential numbers should appear next to each member's name on the selection window, else No
- Allow Reciprocal: click Yes to indicate that members will have the option of selecting Reciprocal giving, else No. Reciprocal operates as follows: if member A selects member B to give to but member B did not specifically select member A, and member B chose Reciprocation on his selection window, then when you run the Reciprocal action via the Compugene Membership System on your PC after all data has been collected, the system will automatically have member B select member A to give to.
- Allow Password Change: click Yes to indicate that
members will have the option of changing their own passwords, else
No
- Names as First Last: click Yes to indicate that member names are to display as firstname lastname or No to display as lastname, firstname
- Timeout Mode: click No Timeout if you don't
want a user to time out, no matter how long the user is logged in;
click Timeout Since Login if you want a user to timeout if he is
logged in longer than your set number of Timeout minutes; click
Timeout Since Last Action if you want a user to timeout if he has
not performed an action in the amount of time longer than your set
number of Timeout minutes; the next box is where you enter the
number of minutes before timeout. Having a timeout limit is a good
security feature; for example, if a user logs in on a PC that
others can access, and he forgets to logout of a session, if there
is no timeout limit, the next person using the PC could access the
previous user's session.
- Show Charges on Selection Window: click Yes if you want to display your charges-per-item on the selection window and the member's current charge; be aware that if you do display the member's current charge, that charge will only include actual selections that the member has made and will not include additional charges that the member might incur if he selects the reciprocation option, since the reciprocation computations are executed only after your online RR has completed, your online data is transferred back to your local database, and you run the Compugene Membership System reciprocation function on your PC.
- Charge Type for Ranges: The 2 different types you can specify for how to charge are Type 0 and Type 1; these different types determine how charges are computed. Type 0 computes charges based on the range containing the total number of items selected by the member, while Type 1 computes charges for the number of items in each individual range. See below, in the "fourth set of options" section, for an example of how the different types operate..
- End of Mishloach Manot: specify an optional ending date for your round robin, which is the last date that members can make their selections, in the form mm/dd/yy or leave blank for no ending date; if a date is supplied, your members will still be able to login after that date to view their already-made selections, but will not be able to change selections or add new selections; they will get a message on their welcome window when they login informing them of this fact. (the value of this item can be referred to in templates as symbolic &ewenddate)
- Ending Template Statement: specify the words you want in a template statement, which is the body of the e-mail that is sent to notify a member of his newly assigned username and password, that informs the user of the final date of your Round Robin, which is taken from the ending date you specified in the previous option. (the value of this item can be referred to in templates as symbolic &ewendstmt)
- How to Say: specify what you want to call the Round Robin in the "How to Say" text box: you can make it "Round Robin", or in some congregations it is known as "Mishloach Manot", so you can specify that wording in this text box; the default if no value is specified is: "Round Robin". (the value of this item can be referred to in templates as symbolic &ewhowtosay)
- Suffix to Names: specify a suffix that you might
want to appear after member names on the selection window; such as
" and family "
- Organization Full Name: specify the name of your organization as it is to be displayed to members on the Welcome and other windows and in e-mails. (the value of this item can be referred to in templates as symbolic &ewinstit)
- Contact E-Mail: specify the return contact e-mail address to be used when sending e-mails from the system
- specify the total cost to a user if the user selected the All option on his selection window
- specify the charge type if you supply ranges in the
charge windows that appear below this entry; these ranges would
normally be set in the Compugene Membership System and transferred
to the online Round Robin at the time your member data is placed
online. See the Help information for the Compugene Membership
System for detailed information about RR charge ranges. The 2
different types you can specify for how to charge are Type 0 and
Type 1; these different types determine how charges are computed.
Type 0 charges based on the range containing the total number of
items selected by the member, while Type 1 charges for the number
of items in each individual range.
For example: let's say a charge range set is defined as:
1 to 5 items, $5 each; 6 to 10 items, $4 each; greater than 10 items, $3 each.
If you choose in your system options Type 0 and a user selects 11 items, each of the 11 items will be charged at the "greater than 10 items" rate, which would be $3 and the total cost to the user would be $33. If, on the other hand, you choose Type 1, then the same user choosing 11 items would be charged as follows: for the first 5 items, $5 each for a subtotal of $25; for items 6 through 10, he would be charged $4 each, for a subtotal of $20; and for the 1 item above 10 (total 11 items), he would be charged $3, for a total charge of $25+$20+$3 = $48; as you see, this is quite a difference from the Type 0 charge of $33! It is up to you to decide which type of charging to apply. Note: Be sure to use the same settings in the Compugene Membership System RR Charges section. This initially will not be a concern, since all your charge settings should automatically be transferred from your Compugene Membership System RR Charges to the Online RR at the time your members are added to the online RR database.
- specify the headings (maximum 3) of sections that will appear on the Round Robin Selection window corresponding to different member types that you want to separate into different sections; for example, you can group all Officers together with the heading "Officers" and regular members under the heading "Members". You can also specify the range of charges or simple charges that a user would be charged for selecting members under each different heading. For example, you can charge $3 each to select Officers and $5 each to select Members. Again, be sure the information here matches what you set in the Compugene Membership System.
View/Update E-mail Template
The standard text of the e-mail that will be sent to a member when his username/password is assigned appears as follows:
To &ewfirst &ewlast: You have been assigned the following Username and Password to allow you to access the Compugene Membership System on-line Round Robin system and select your RR choices as a member of your organization, &ewinstit:
Username: &ewid
Password: &ewpw
Please keep these values in a safe place and use them to login to the RR system.
To login, click on the following link or use your web browser to go to http://www.compugene.com/rrlogin.php or, go to website www.compugene.com and click the link that says 'RR Login'.
If you need further information, or to change your password, please contact the RR administrator for your organization, &ewinstit.
Thanks for using the Compugene Membership System by Compugene Software!
Note that the words above in red are known as symbolics and will have values substituted for them at the time the e-mail is produced.
The permitted symbolics for e-mail and their substitution values are as follows; those that have * next to them can also be used in the Welcome Window message:
| &ewfirst | member's first name(s) |
| &ewlast | member's last name |
| &ewinstit * | name of organization |
| &ewid | username assigned |
| &ewpw | password assigned |
| &ewhowtosay* | your choice to call it Round Robin, or Mishloach Manot or whatever you choose |
| &ewenddate * | the last date that members can update their Round Robin selections online |
| &ewendstmt | a sentence that can contain the &ewenddate symbolic value |
| &ewadmin * | the name of your Online Round Robin administrator |
| &ewpurim * | the English calendar date that Purim will next fall on |
You can modify this text and click Update to save your modified template.
View/Update Member Data
Selecting this button will display a window that will allow you to display and/or modify details for a member of your organization. You, as the administrator, can change the username, the password, the e-mail address(es) and other details of a member.
Member names to select on this window will normally display as member names in the dropdown box. You can change the selection box to display usernames by clicking the check box that says "Show by id?" and clicking the Refresh button.
1) If you want to change a member's username, the new username selected must be unique, not just in your organization but in any organization that is using the Compugene Software round robin system. Since you can't know all usernames that are currently in use by all organizations before you choose a username, if you choose a username that is already in use, you will be notified of that fact and will be able to select a different username.
2) If you select the option (see above, "View/update system options") that does not permit members to change their own passwords, only an administrator will be able to change a member's password.
3) You cannot modify the member's round robin selections.
4) You can assign another member as administrator by setting the Admin code for that member to 1; to remove administrator rights from a member, set the Admin code for that member to 0. Any number of members can have administrator rights.
Names/Passwords, Selections:
Choosing this selection will return to you 2 different batches of data in 2 textboxes on the displayed window:
1-Batch 1: the usernames, passwords and unique id numbers for all members in the system and
2-Batch 2: the Round Robin choices that all members have selected in the on-line Round Robin
You can copy and paste this information into the Compugene Membership System to perform the following 2 tasks:
1- Batch 1: you copy and paste this data into the appropriate section of the Compugene Membership System running on your pc and then produce printed letters to members informing them of their newly assigned usernames and passwords if for some reason you don't want to use the online system's ability to automatically send e-mail to users as it assigns usernames and passwords OR you have users that do not have e-mail addresses and require that a letter informing them of their usernames and passwords must be sent via regular mail and not via e-mail.
2- Batch 2: you copy and paste this data into the Compugene Membership System at the appropriate section to update your Round Robin information by posting all member's online choices into your local CMS database. An alternative way to do this is to use the option detailed below, "Send selections via e-mail". Either option can be used to get the member choices into your local database.
Send Selections Via E-mail:
When this button is selected, all round robin selections of all members will be e-mailed to your e-mail address; once you receive this e-mail, follow the instructions in the e-mail to cut and paste the contents into the text box of the Compugene Membership System that is set to receive such information; when you do this, all member round robin selections will be entered into your database. Note: any existing selection data in your database for a member is deleted and replaced by any new data that is entered for that member via this technique.